

How To Add Sonarlint Plugin In Eclipse
Join the DZone community and become the full fellow member experience.
Join For Free
In this article, I volition explain the steps to:
1. Configure SonarQube in Eclipse with theSonarLint plug-in.
two. Configure an Eclipse projection with a SonarQube centralized server/local server.
SonarQube is used for Code Quality Analysis and provides the capability to non only show the health of an application simply also to highlight issues newly introduced. With a Quality Gate in place, you can prepare the leak and therefore ameliorate code quality systematically.
SonarQube is internally using PMD, Findbugs, CheckStyle, etc. If needed, we can add additional plugins according to our requirements. For Example, we can add JUnit additional plug-ins.
Configuring SolarLint three.three Plugin in Eclipse
In one case, sonorLint is configured in Eclipse, it'll help to identify errors or bugs in development phase itself. sonorLint analyzes the source lawmaking and if any errors show upwardly in the sonorLint console, the developer will be notified while editing the lawmaking.
Step ane:
Bank check the Java configured on your local pc.

Step ii: Download the Eclipse sonarLint plugin
Eclipse->help->Eclipse Marketplace->Type sonarLint ->click install (Restart eclipse after it has been installed successfully).

Stride 3:
To run sonarLint automatically, enable the checkbox under projection properties. Information technology helps developers to highlight errors and bugs while writing code.
Project->Properties->sonarLint

Step 4:
Select the SonarLint console to view the sonarLint log.

Step five:
How do you employ the sonarLint report?
- Every Save, sonarLint Beginning analyzes the code and the report is shown in the SonarLint-on-the-fly Report tab.

- To view issues, click the SonarLint On-The-Fly tab.

- To view the Dominion Description:
Steps to Configure an Eclipse Project in a SonarQube Centralized/Local Server
Stride 1:
Download related software and configure it to your local car:
one. sonarqube-six.7
2. sonar-scanner-3.0.three.778-windows
Step 2:
Unzip sonarqube-6.7 and sonar-scanner-iii.0.3.778-windows in your local directory nether the sonar principal directory.

Step three:
Set surroundings variables for sonar-scanner-3.0.iii.778-windows.

Step 4:
Create the projection in the SonarQube server past editing the sonar-scanner.backdrop file nether D:\Evolution\Sonar\sonar-scanner-3.0.three.778-windows\conf directory.
 Stride 5:
- Run sonarqube-6.7 server.

Note: The sonarqube-6.7 bin directory contains an (Windows, Linux, Mac) operating system boot file. Refer to the screenshot below. I take run my SonarQube server in windows-x86-64 directory because my PC is 64-bit, You tin can choose you preference based on your system configuration. 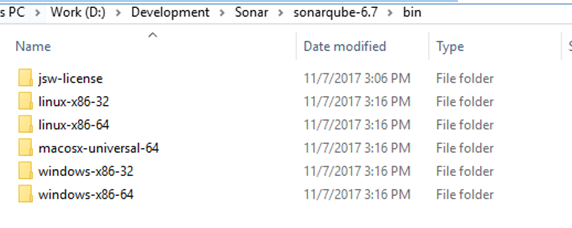
Footstep half-dozen:
Demark an Eclipse project with a SonarQube projection by clicking:
Project ->SonarLint->Bind to sonarQube Project

Click 'Motorcar bind selected projection.' Information technology helps to demark automatically with the SonarQube server.
Annotation: Nosotros have already created the project name, "JavaProject," and run the SonarScanner and created the project name in the SonarQube server.

Eclipse
Opinions expressed by DZone contributors are their own.

How To Add Sonarlint Plugin In Eclipse,
Source: https://dzone.com/articles/sonarqube-67-amp-sonarlint-3-eclipse-plug-in-insta
Posted by: hickscolithat.blogspot.com
0 Response to "How To Add Sonarlint Plugin In Eclipse"
Post a Comment